3.1 Installation
3.2 Switching on the device
3.3 Menus and windows
3.4 Process log
3.5 Set folder of working directory
3.6 Loading samples
3.7 Experiment setup
3.1. Installation
System Requirements:
-
Requires a 64-bit processor and operating system.
-
OS: Windows 10 (64-bit OS required) or later.
-
Processor: Intel(R) Core™ i5-7500 or later.
-
Memory: 16 GB RAM.
-
Storage: 15 GB available space for the software to run without issues plus enough space for experiment data.
Detailed Installation Process:
-
Download: The user should visit our website to download the Violet software executable file.
-
Run Setup: Once the executable file is downloaded, the user should double-click on it to begin the installation process.
-
Follow Instructions: The user should follow the on-screen prompts and instructions provided by the installation wizard. They may need to choose the installation location, agree to terms and conditions, and customize installation options as needed.
-
Installation: The installation process will begin, during which the software components will be copied to the user’s computer.
-
Completion: After the installation is complete, the user may be prompted to launch the software. If not, they can manually launch the Violet software from the location where it was installed.
-
Verification: Upon launching the software, the user should ensure that it functions correctly and is ready for use.
The Violet software is a standalone executable, allowing the user to run it from anywhere on their computer after downloading it from our website. They simply need to locate the executable file and double-click to launch the software.
3.2. Switching on the device
To activate the device, the user must ensure it’s connected to a power supply and all USB connections are established between Violet 3.0 and the computer. First, the user should switch on the power using the designated power switch. Then, the user must toggle on the laser key, ensuring it’s activated to avoid operational issues.
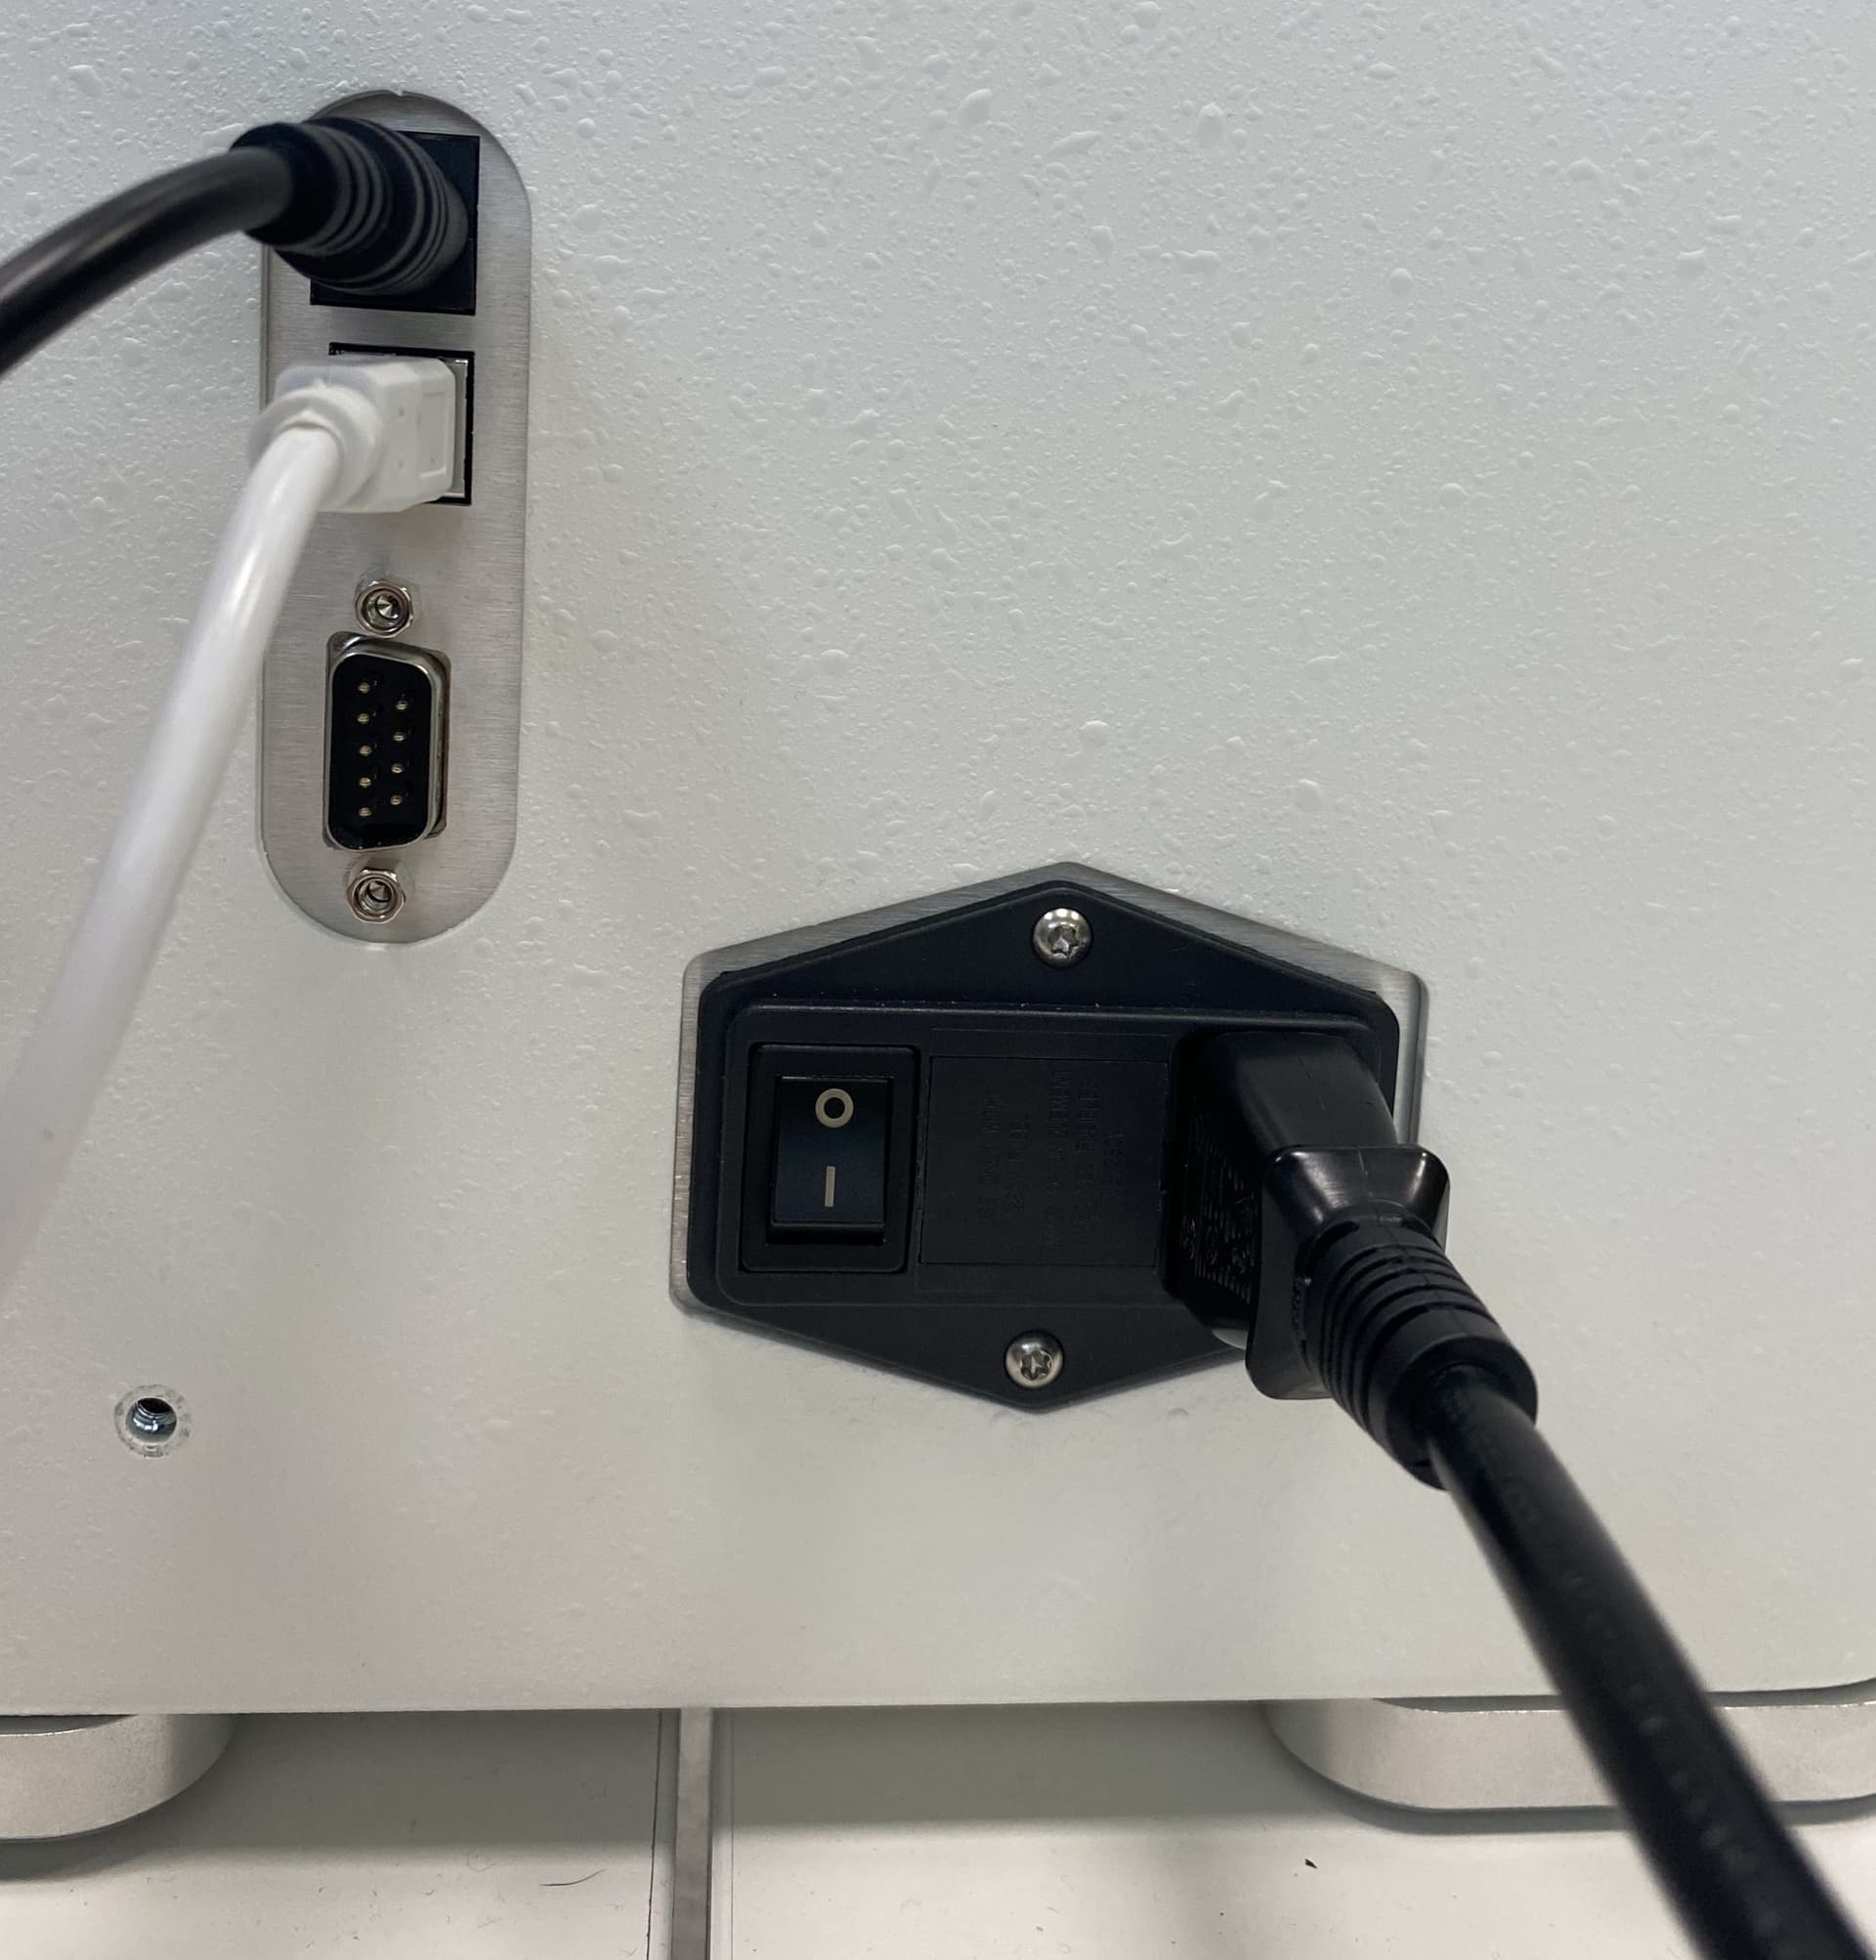
Power switch
3.3. Menus and windows
The Menus and Windows section comprises four essential menus that collectively support the entire experimental workflow, from initial setup and data acquisition to result analysis and data management, which are Experiment Setup, Acquisition, Experiment Results, and Saving.
![]()
Main windows
Experiment Setup: This menu is where users configure parameters and settings before starting an experiment. It enables defining experimental conditions, creating the experiments, selecting directories, and loading files. This menu provides a structured interface for specifying initial conditions, ensuring accuracy, and maintaining consistency in experimental procedures.
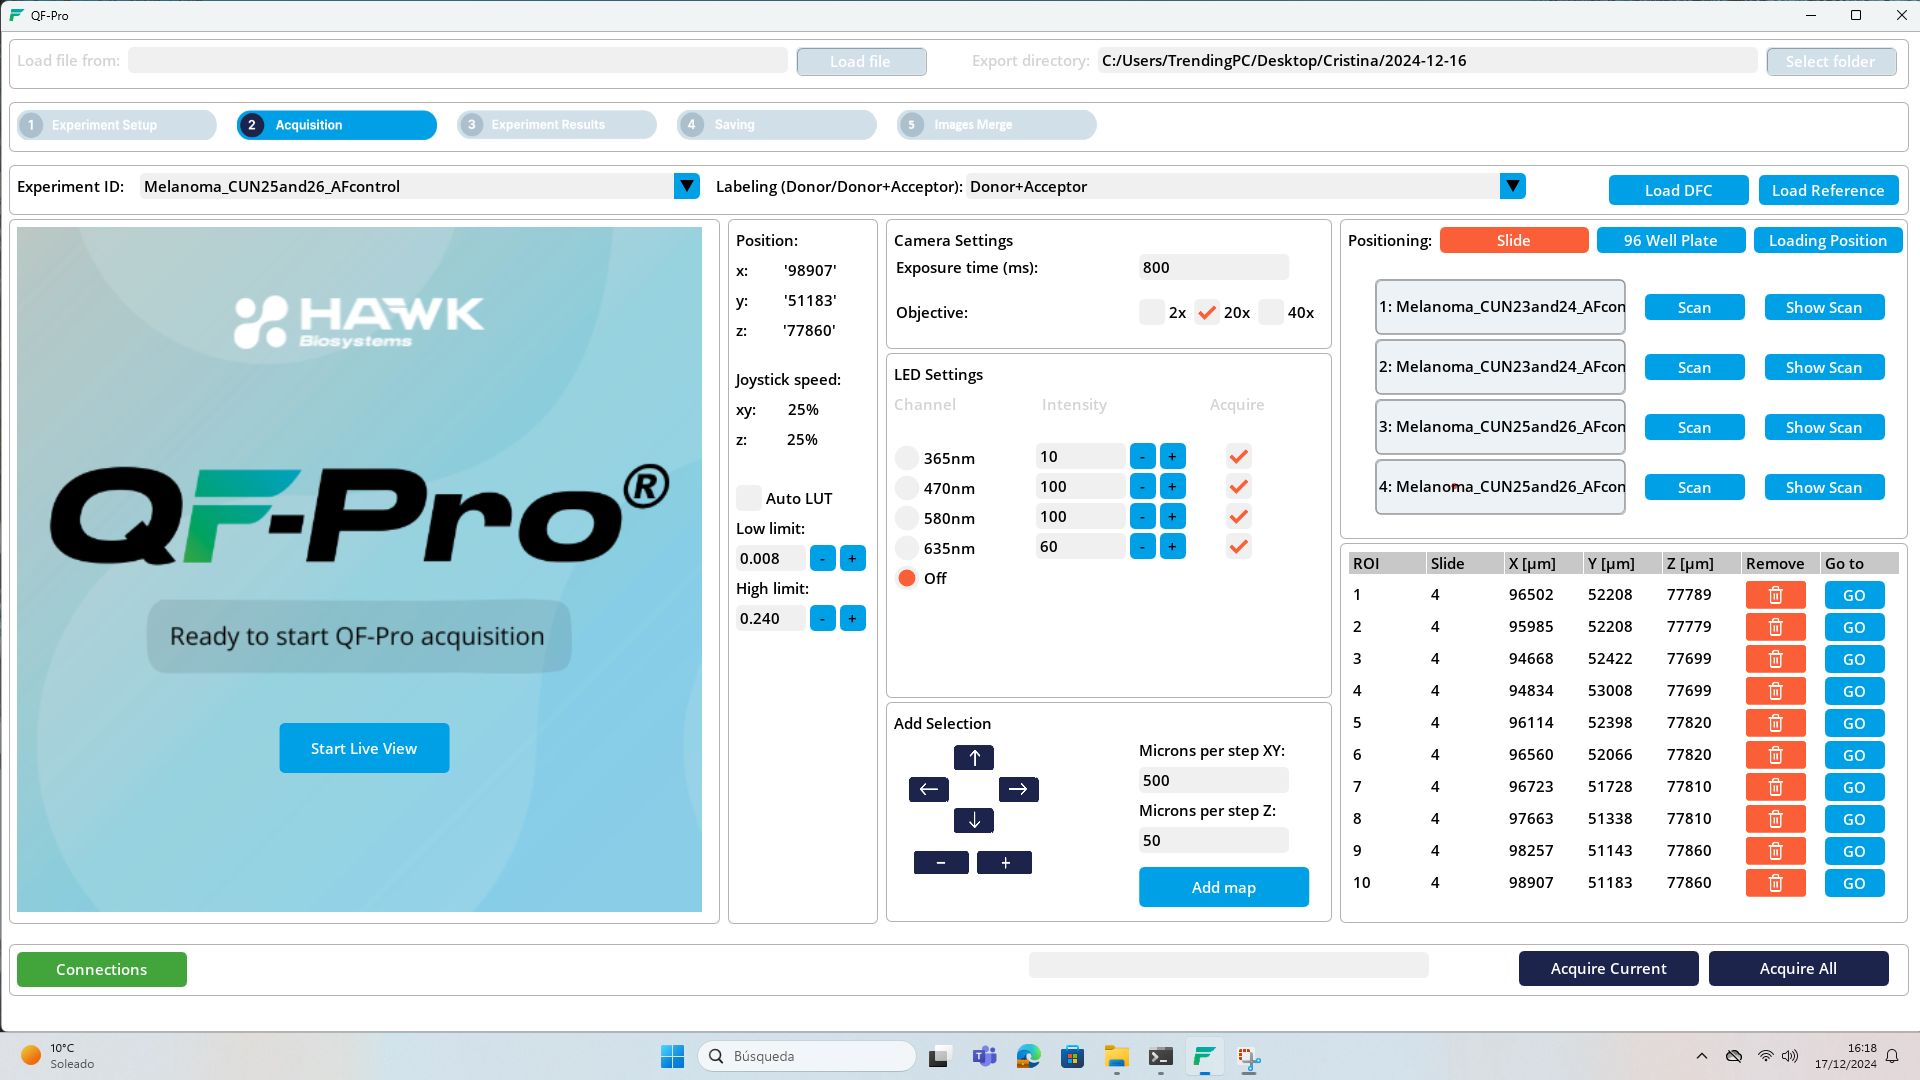
Acquisition: The Acquisition menu in the software is a versatile tool for efficiently capturing data during experiments. It allows users to configure different settings such as the camera, objective, and LED; and has options for automatic or manual stage positioning, mapping, data acquisition, reference taking, and dark field correction, and finally, acquiring images. It also has the option for live previewing, and snapshot capturing.
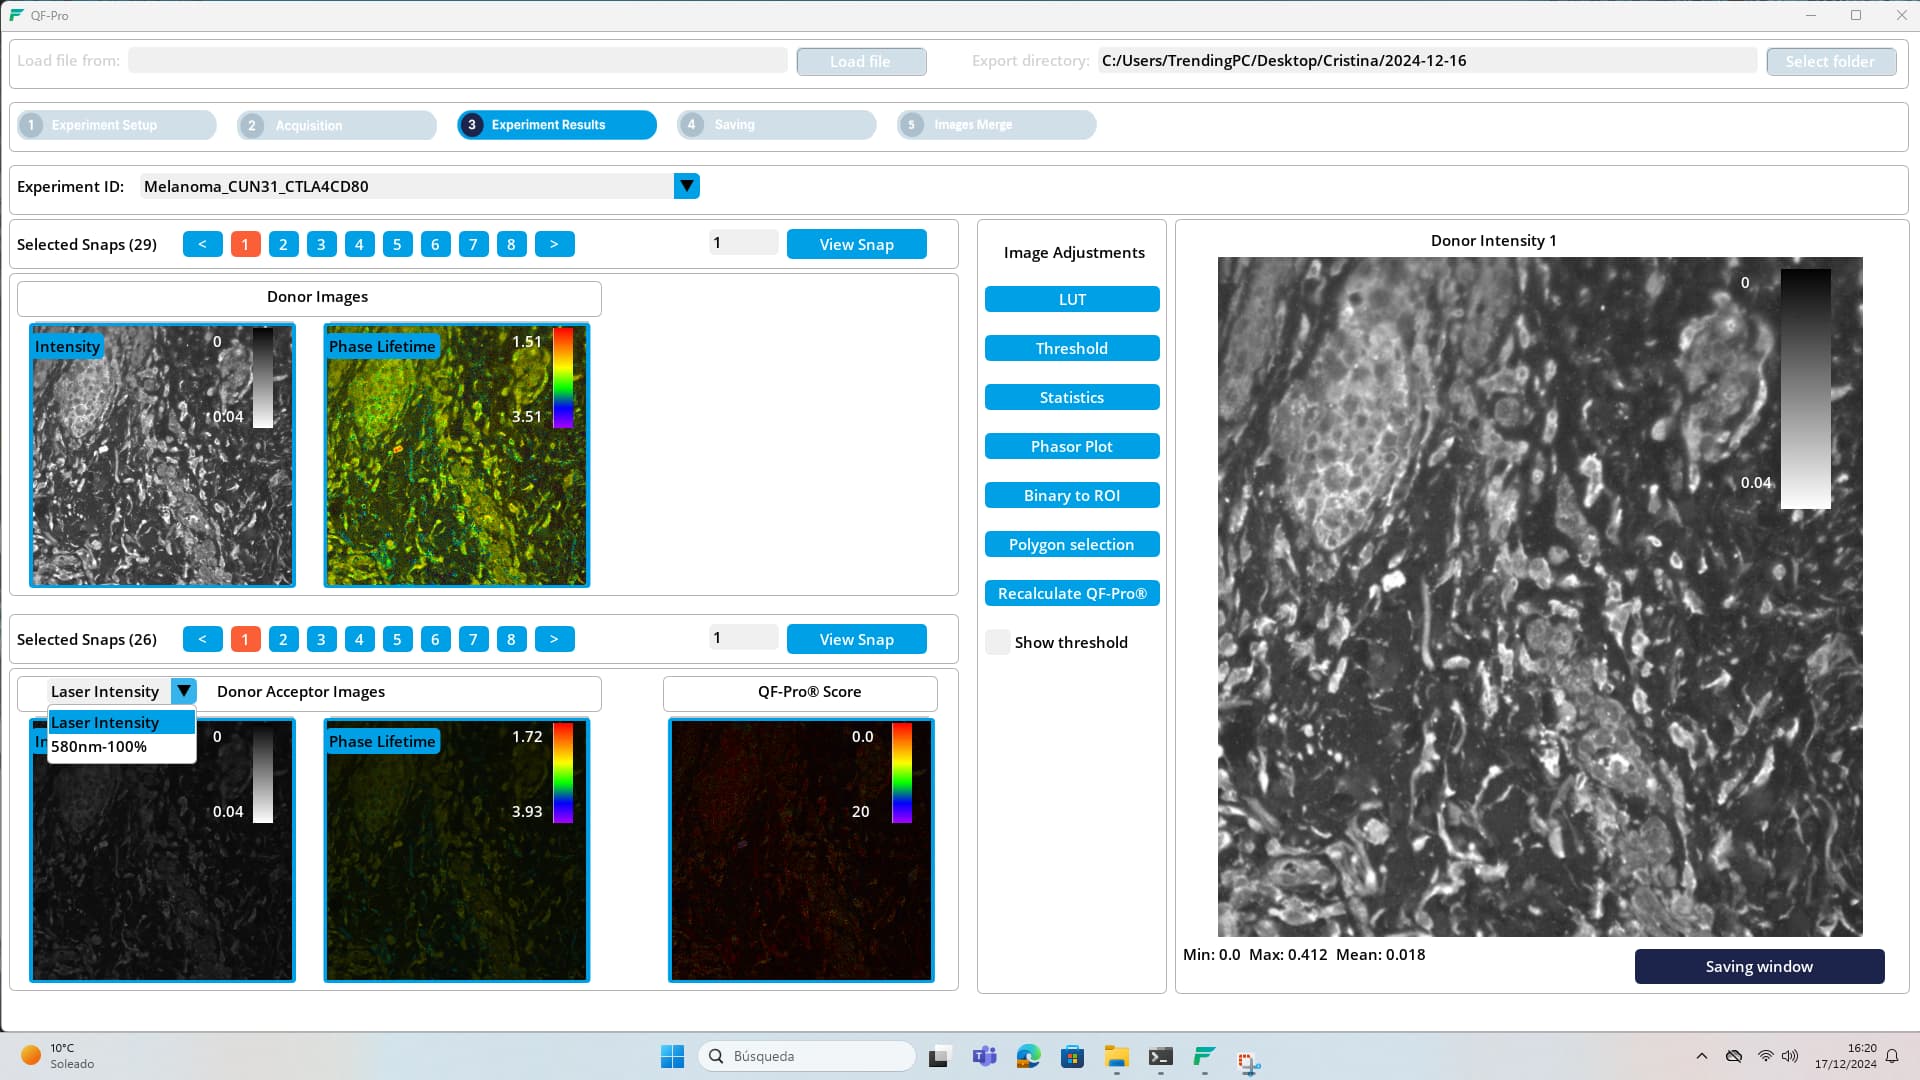
Experiment Results: The Experiment Results menu provides access to data analysis tools and visualizations for interpreting the results of conducted experiments. Users can view and analyze acquired data (by doing the threshold, LUT, binary to ROI, and polygon selection), generate plots and graphs, and perform statistical analyses. This menu also includes options for exporting data and generating reports. It serves as a central hub for exploring and interpreting experimental outcomes, facilitating informed decision-making and further experimentation.
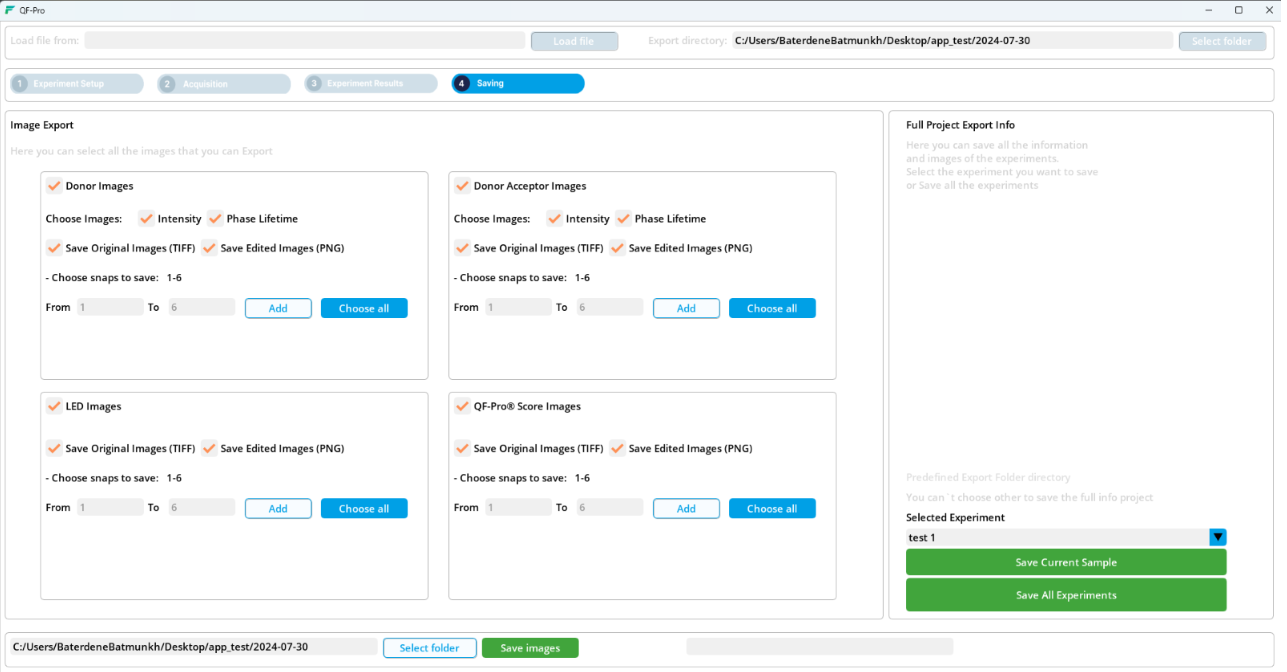
Saving: The Saving menu offers functionalities for saving and managing experimental data and results. Users can save data files in various formats, specify file names and locations, and organize data into folders or directories. By ensuring proper data storage and organization, the Saving menu helps maintain data integrity, accessibility, and reproducibility throughout the experimental process.
3.4. Process log
When the program is executed, a text document named “Experiment_log” is automatically generated in the directory where the application is located, containing the process log. This logging process provides complete traceability of all operations performed during the experiment, generating a detailed log identifying all stages of the experiment, including actions performed, parameters adjusted, selected settings, and other relevant operations. Because of this, the process logging is used for maintenance purposes, allowing users to send logs to the Maintenance Department for addressing technical issues or performing diagnostics.
3.5. Set folder of working directory
The “Set Working Directory Folder” function allows the user to configure a specific folder where all data and logs related to the ongoing experiment will be saved, which provides complete traceability of operations performed during the work session. The set folder option appears first thing when opening the program, but it can also be configured later in the “Experiment setup” window.
Click on the ‘Browse’ button and select the folder you want to use as a workspace. The route to the folder selected will appear on the screen and the button 'Start Work’.
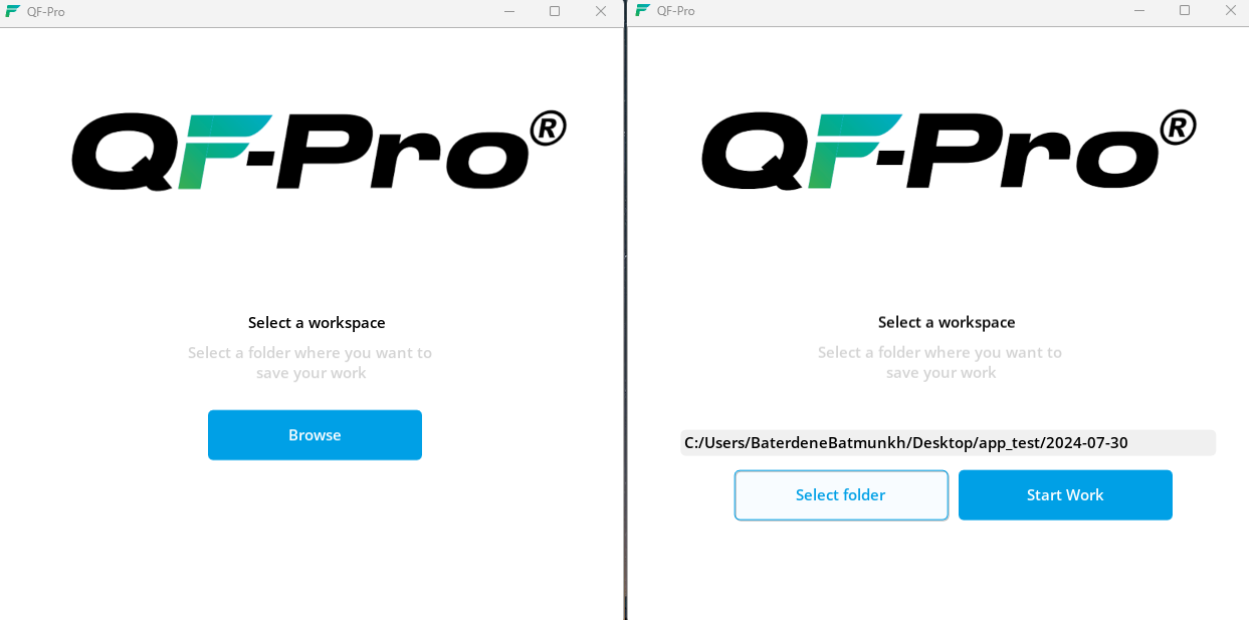
Workspace selecting window (left) and ‘Set Working Directory’ Folder on the ‘Experiment setup’ window (right)
3.6. Loading samples
To load samples, open the door to the access bay. Select ‘Loading position’ on the positioning panel, making the whole stage accessible. Load your required stage insert (4 slides or 1 multi well plate). The user can then insert their chosen samples into the device.
For loading a plate, push the plate securely into the stage insert so it lies flat and is held in place by the spring-loaded arm. For slides, place each slide into position so it lies flat and secure. There are small black plastic tabs to keep the slides aligned and spring-loaded silver buttons to hold each slide in place. When slides are loaded close access to the stage and begin using the software.
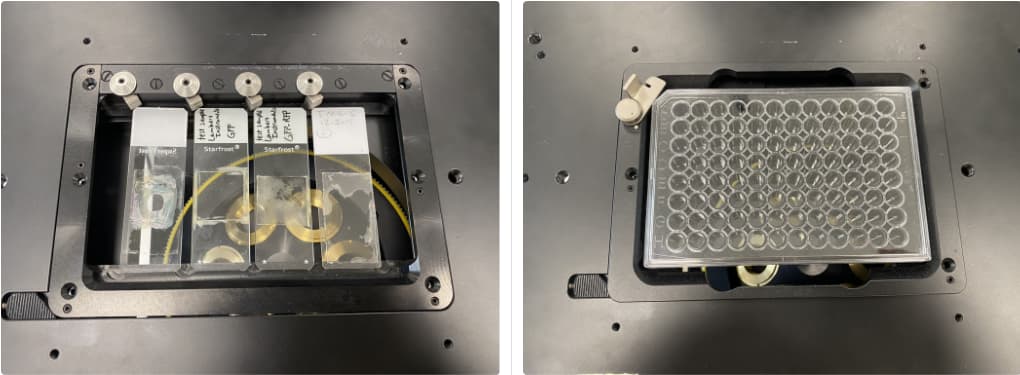
Slide plate (left) and well plate (right) loading
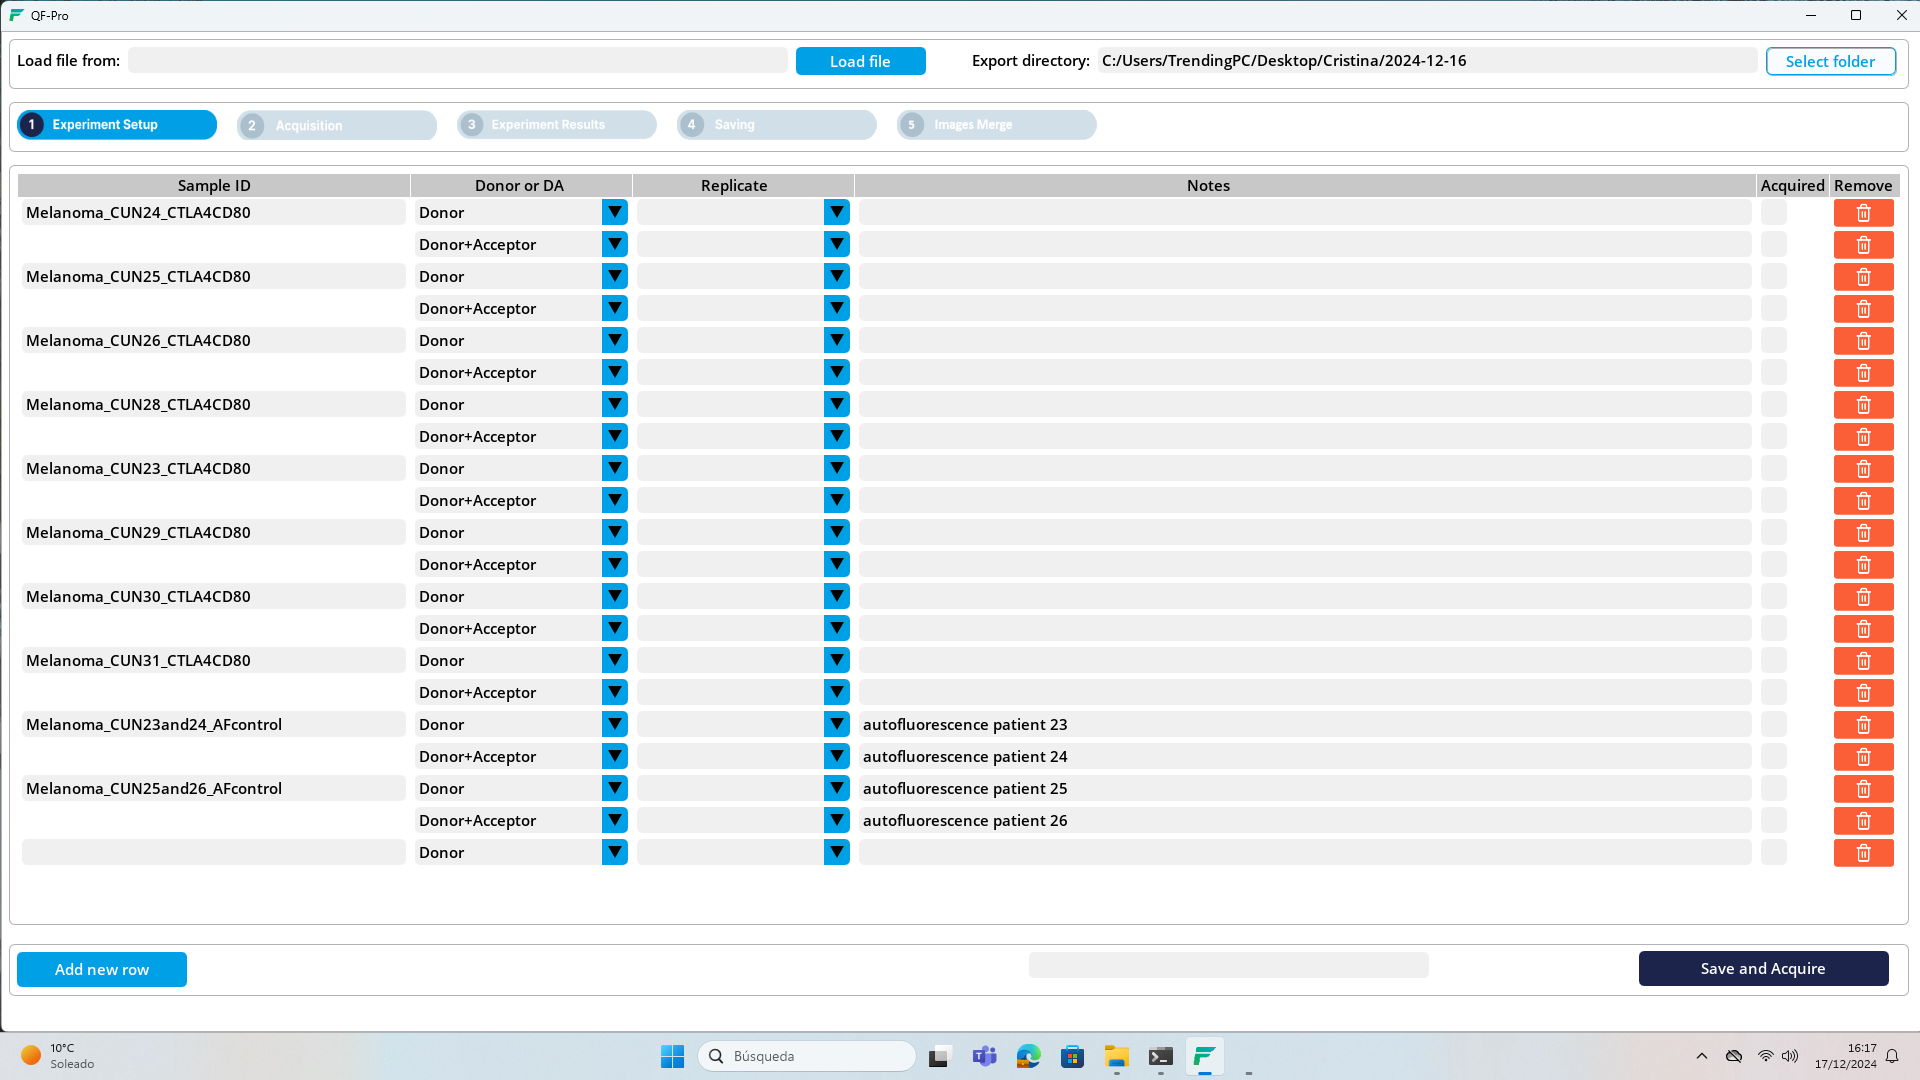
3.7. Experiment setup
Experiment setup is a crucial part of the working process. Here are the steps for configuring the experiment before its execution:
- Open the “Experiment Setup” Menu:
In the software’s main interface, upon opening the program, the “Experiment Setup” window appears:
- Enter Experiment Details:
-
Provide a descriptive name for the ongoing experiment in the designated field.
-
Click on the file navigation button to select the folder where you want to save the experiment data, if you have not done it in the previous window.
-
Alternatively, you can load a previous experiment through ‘Load file from’. Press on the button 'Load file’ and search for the desired experiment within the file system, select it, and press the “Load” button to load it.
![]()
‘Set Working Directory’ Folder on the ‘Experiment setup’ window
- Select type of acquisition:
By default, ‘Donor’ option is selected, since a second row with ‘DA’ selected appears automatically once the setup is saved, or when a new experiment row is added.

‘Donor or DA’ drop-down button
- Replicate experiment option:
If you want to replicate an experiment’s configuration with different samples, you can choose this option when creating a new experiment. To do so, the experiment you want to replicate must be previously created or loaded in the setup table.
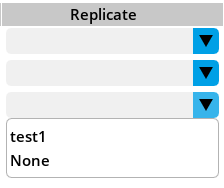
Replicate drop-down
- Add new row:
With this button a new experiment row will appear under the last experiment you created.
Add new row button
- Save Configuration and Proceed:
Once you have entered all necessary details, click the ‘Save and Acquire’ to confirm the setup.
![]()
Save and Acquire button
Go to next section: 4.- Connections